
It’s time for a tutorial! Our monster hunters need a lot of weapons for their tour, but good looking weapons are hard to find. But you can Steampunk your own toy guns, and now I’d like to show you how!

Here are the tools I used on these guns:
- Toy Guns
- Toilet Brush Holder
- Plastic Flower Vase
- Metallic Spray Paint (The expensive stuff that makes you gag. Wear a mask.)
- Acrylic Paints
- Rub-n-buff Metallic finish
- Gold Leafing
- Brass Stampings
- Little bits and things that look Steampunky (Knobs and Dials, Plastic Bottles, Plastic Tubing)
Inspiration
What do you want your gun to look like? I wanted old fashioned hand held Mortars, early revolvers, anything that looks a little out of place historically. I looked for pictures of antique guns on the internet and found some really nice inspiration!
Step 1: Acquire Toy Guns
I went to the store to find guns that I could adapt into something similar to the images above. Finding the rifle part was easy, finding the mortar part proved extremely difficult. I shopped at Wal-Mart, K-Mart and Lowes for my supplies. I chose the guns based on the level of detail and Historically-ness. Many toy guns look like a weird future-y hot mess. I super wanted the Boba Fett gun, because it makes “pew pew” noises, but I didn’t get it in the end.
The closest thing I found to the Mortar front was part of a floral display at a store, and they refused to sell it to me, even though a few were missing already. In the end I spotted a toilet brush at Lowes and floral vase at the dollar store that I thought might work!

Step 2: Take Apart Toys
The next thing I did was carefully remove all the screws and thingamabobs from the toys. Try to remember what goes where. I kept all my gun parts in their own baggies, however, I neglected to watch how to replace the trigger mechanism on one, and it took me about an hour to figure out again… so pay attention!
I separated the pieces into which ones I wanted to paint which metallic color.

Step 3: Make Changes to the Guns Body
Next, I glued the Mortar Parts that I found onto each gun piece. You’ll notice the gold paint in one, and that’s because I didn’t find the front mortar part until after starting the project. The one on the left is the toilet brush holder and the one on the right is the flower vase.

I also broke off the modern, shotgun bottom on the gold/white guns lower front. I thought it looked out of place, and there were loops where the screws attached left behind which gave me ideas.
Step 4: Paint the Pieces
I bought the best metallic spray paints I could find in gunmetal grey. It was an all-in-one sort of paint, primer and paint all at once. It was the worst experience of my art-making life. The paint made my lungs burn, head ache, etc. until I became so sick that I developed a horrible flu. So, remember to use plenty of ventilation and a mask — or buy less obnoxious spray paint.

If you need one piece with two tones (Mine was white and gold), use blue painters tape like you would on a wall to block off one side. I attached my tape close to the edge and covered the rest in a plastic shopping bag.
At this point I also started doing little touches. I didn’t like the edge on the toilet brush holder, so I added some craft foam strips.

Once the spray paint was dry, I added “blacking” by using a bit of burnt sienna and black acrylic paints and dabbing in thoroughly in the crevices, they wiping off the excess with a wet cloth. On the gold/white one, I also added a pearl acrylic paint to make it more shiny. I also did Brown/metallic red for the handle of the silver gun.
Step 5: Adding Metallic Leafing and Rub-n-buff
I used gold leafing on the gold gun, putting the leaf over every gold piece. Because leafing is metal, it makes the piece look more realistic. On the gun-metal grey, I used silver metallic rub-n-buff, a wax finish that becomes more reflective as you rub it. On top of the gunmetal grey it looks very real. I used it both sparsely and heavily depending on where I wanted it to look aged. I also used leafing on the details of the revolver, which you can see below.
Step 6: Re-assembly
Re-assemble the guns.
Step 7: Adding Steampunk-y Bits
I have a bunch of steampunk bits hanging around. On these guns I used dials, knobs, brass stampings, bits of plastic bottles and cases and glued them about attractively.
In the picture below you will see some knobs that I added. I paint all these pieces to match, of course, and then use the acrylic to black the crevices on each piece I add. I also added some tubing on the gold/white one. The way I made the clear plastic tube look copper was that I sucked the paint into it like a straw, then blew out the excess. This works better than painting over the tube, because the plastic tube remains indefinitely tacky with spray paint, and acrylic can scrape off if you paint over it.
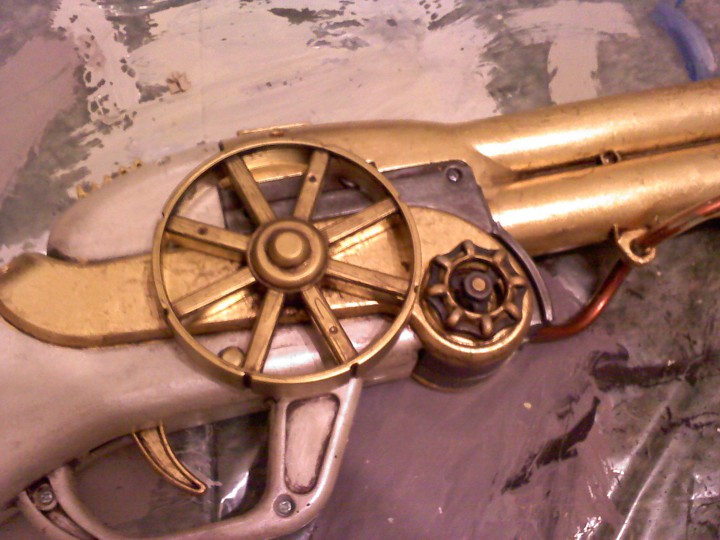
On the revolver I added little bottles and bits. Below you can see the gold leafing over the etched design. The bottles, in fantasy land, are supposed to coat every bullet that passes through the chamber with silver to kill the monsters!

Looking closely you will see little monster brass stampings placed on every edge of the bottles on top of the revolver. Each monster is different. I got them on Etsy.

Finishing the Guns
First I finished the revolver. There were only a few little touches, like adding a few bits here and there. Capping every screw hole with a scrapbooking rivet, for example, which was done on all of the guns.

You will see I added a dragon to the side of one mortar rifle. I still need to make a little leather bit to cover the toy gun’s logo on the handle of the silver gun.
I hope this will help you steampunk your own toy guns for your costumes!
Here are pictures of some more guns I made using this technique:

These guns are for ladies. The ivory and pearl accents add a feminine touch. This gun started out bright orange!
The next one is a set of Flintlocks.

The Flintlock pistols were painted with ivory and the silver was leafed and tarnished. The gears and pearl accents were also added.
The next set are a cool looking pair of guns that I thought would be a nice addition for Sir Hammerhorn.

I added pearl and ivory accents to these guns as well, using spray paint and craft pearls.
While these three sets all have a similar theme, you can do anything you want to toy guns, and they look so cool when painted new colors!
