
Today I have decided to blog about our Steampunk Genie chapter! You can read the chapter here.
In the book Philomena Dashwood travels to Turkey to observe the only known genie in captivity. She witnesses the theft of this rare, demonic monster — in its lamp — by our Steampunk Thief! Philomena decides to pursue this Steampunk Aladdin to get the genie back, but to her surprise, the thief starts making outlandish wishes, which the evil genie grants, and causes enormous trouble! To make matters worse, the Thief takes a fancy to our heroine, and begins some heavy amorous advances.

Costumes – Philomena Dashwood and Percy Longville
Philomena’s Middle-Eastern influenced costume was created by designer Alisa Kester. She provided around 30 fun steampunk costumes for the book.

The Ottoman steampunk outfit has been featured in other photoshoots besides this one, as well. We even used it in our first collaboration. The outfit features numerous layers of linen as well as embroidery using beetle wings. Alisa also supplied fancy shoes!

I did not get any close ups of Percy’s costume while it was being made. He wears wool pants, a damask shirt and a really cool turban that I built using blue yarn.
Costumes – Cyprien the Steampunk Thief
Alisa designed the Steampunk Thief sketch without much input from me. Alisa designed the thief on paper, with an emphasis on decorating the costume with the “evil-eye” which is a commonly found symbol intended to ward off evil spirits.

After receiving her sketch I began to gather materials to build the costume. I built the costume myself, trying to bring her sketch to life.

I chose fabrics to match Alisa’s popular “Steampunk Ottoman” because Philomena wears that costume for this scenario. The fabrics are linen or linen-like, and I even found a large swatch of embroidered fabric for the lowest layer that worked out very nicely.

I began by taking a pattern for a shirt and altering it to have the curved neckline. I reduced each consecutive piece’s neckline so that all the fabrics would be revealed when layered on top of one another.

The machine embroidered fabric is the lowest layer, and so I put that one together first, then the red, then the light-brown.
In order to prepare for the embroidery, I went to Michael’s, because I remembered seeing an “evil eye” piece there. Imagine my surprise to find around 20 different evil-eye choices, ranging from beads to jewelry! I chose some flat beads for the jacket front, and some round beads for the shoulder detail.

I did some very simple embroidery on the sleeves and then attached eyes and bells to it. A thief that jingles is pretty impractical, which goes with one of our costuming themes — the least practical outfit for every situation the characters find themselves in!

The embroidery really hurt my eyes, and I probably won’t be able to do embroidery any more. My eyesight was blurry for an entire day afterwards, and then ached. I went to the eye doctor, even, to get new glasses, but he recommended not putting so much strain on them as I have in the past. So, no more embroidery for me!
I also had been keeping a threadbare cotton shirt in my closet for years, hoping to use it again, cause I liked the way it looked. I re-made the collar to scoop with the jacket, and removed the sleeves. This will be the lowest garment of the piece. It has some blue machine embroidery down the front.

Alisa’s design also included a belt-harness for the chest. This was the most difficult part of the costume. I went to EVERY thrift store in the area buying belts that matched in color, or belts with cool buckles. I could hardly find anything, and after a whole day of searching I decided to go to Ross: Dress For Less, and let me tell you that I had so much better luck than I did at the thrift shop, and I got better prices. After that, I tore the belts apart and re-assembled them. I used rivets for the first time, and decorated each belt-buckle-hole with a golden eyelet!

I’ve also gathered various belts and fabrics for a turban.
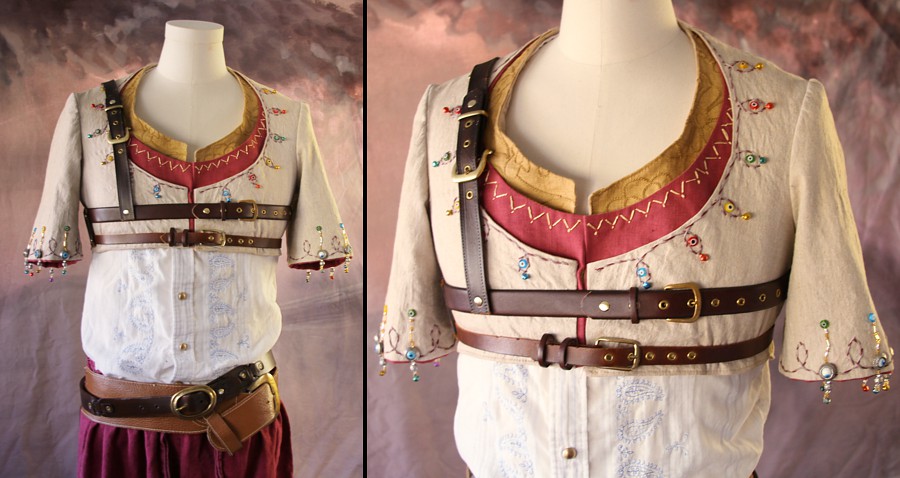
Chest belts and layered vests form the top layer of the outfit. Evil Eye embroidery covers the garment.

Many belts, including a custom belt by my co-costumer here in Montana, Catey Lockhart, cover a blue sash and heavily distressed red pants. Numerous things hang from the thief’s belt. These are the the things the thief collects for his journey.
When I make things, I often find inspiration in The Legend of Zelda. With these evil-eyes, I wanted them to look like something Link could shoot with an arrow to open a door! I found some round ring beads and some round evil-eye beads, and I put the eyes in the rings to complete this effect. You can see this in the sleeve detail below!

The belt features lion headed rings for hanging things, as well as a faux-leather pouch which we bought at Target.

Model Bowen Kinsey portrays Cyprien, a character who will appear in a large portion of the book.

But Cyprien also has a costume change when he starts wishing for things. We wanted him to look garish, like a man who didn’t know what taste was, only opulence. This peacocking outfit was also sketched by Alisa and sewn together by me.

I gathered some rainbow colored linens, and found some appliques online.

I built the coat using a few pattern pieces as well as a few pieces that I designed my self. A sort of mish-mash of techniques.

I also built a billowy blue pirate shirt to go underneath the purple coat.

The green sash was stolen from our model/hair & make-up lady, Lizzie. It was a table runner, and I took it out of her drawer while she was at work and she wouldn’t answer her phone. Shhhh. Don’t tell her. I added some green decor ribbon to it. This was used as a sash for the costume.

But then she tried to give me every table runner in the drawer when she found out.
The jacket features many round buttons and loops. While it can close, I wanted to see more of Bowen’s chest, so we leave it open.

The purple coat has split sleeves with reveal the blue shirt underneath.

I also built a turban out of matching fabrics. This turban is actually built on top of a cap so that you can pull it on and off without having to wrap it.

Below you can see the costume in full detail.

You may have also noticed the backdrop featured in all of my final images?
My aunt and I got together and painted that photography backdrop for the photos.

My aunt prepared her bedroom with sheet plastic, and together we painted this in around four hours using Tempera paints.
We used some backdrop canvas material left over from the Highschool play I did 15 years ago, (7 Brides for 7 Brothers) which I helped direct and built the sets with my father… so we had leftover canvas hanging around for years. What do you think?
Photographing the Heroes
I had so many people and so many props to fill the Middle Eastern sets with that I felt I needed a sketch of all the colors that would be involved.

Brin, Bowen, Lizzie and our new friend Myyah, who plays a middle eastern maiden, put together this shot with me. We had to get everyone extremely close together to fit in the frame.

We had a full Middle Eastern inspired set and the shoot also featured another one of Alisa’s beautiful Middle Eastern Steampunk outfits on Myyah! This is the only really clear shot of it. It was put together from a few random pieces that Alisa supplied that had no specific purpose that she had conceptualized. So I put a concept together to style the outfit, but Alisa made all the main pieces.

The shoot also took us outside to photograph Brin chasing Bowen, an image prominently featured in the book as they jump through the skies of Constantinople!

The portraits were all done in front of the Turkish backdrop.

Brin and Jeremy were photographed both separately and together. I liked the one of them together the best, but Brin sure had fun alone:

We shot these portraits near the end of our time together.

Brin is a snapchat fiend and you can follow her adventures on snapchat and instagram @Brinjatheninja !

Overall, the shoot was a pretty exhausting process because of how many costumes and set pieces had to be accounted for!

Photographing the Genie
I am going to make a whole separate post on creating the genie. But we shot the genie separately from the rest of the characters. He is portrayed by my go-to guy, Jake.

As you can tell, Jake is pretty handsome, and this makes people ask, “Why is he in a mask?” Well, Jake and I used to shoot male model stuff all the time, but then we discovered he liked portraying monsters more. So, there you have it!
The whole modeling process for Jake involved being bound up in my worbla Genie Armor with little arm movement and zero vision. All in all, it wasn’t a very difficult process. But once the photos were taken, I could cut Jake out of the picture, leaving behind the armor.

I used these images in addition to the ones I took with Bowen as the thief to create a mock-up of the final image that I wanted to create.

You can compare the mock-up to the final image to get an idea of my process!

I hope you enjoyed this wealth of behind-the-scenes material!
