
Did you enjoy reading chapter three of A Steampunk Guide to Hunting Monsters, A Mechanical Mummy, for free online? If so, then you may enjoy reading this post about how the photos were made!
Costumes – The Mechanical Mummy
Alisa Kester made herself a steampunk Mummy costume which mixes Egyptian styles with Victorian styles, and includes a corset and bustle. This is one of the costumes she provided for the book.

Alisa first wore this outfit to steamcon, and wanted it to look more like a rejuvenated mummy when she wore it. But when it was featured in “A Steampunk Guide to Hunting Monsters” I modified the look to suit a scary monster rather than a lady.
I sketched a steampunked version of her costume by adding various mechanical bits. Below you will see the concept art for this character by Tyson and Alisa. After these drawings were finished, I had to bring my ideas to life!

I gathered various steampunk-y bits and mushed them together to make a mechanical brain for the mummy. In the ancient world, Egyptians threw away the brain first, believing it to be the only truly useless part of the body… which is strangely hilarious. Our mummy uses this steampunk brain to think!

In the photos below you can see some of the early process as I try to figure out how the mechanical brain will fit in the hat.

For the mummy face, I took a foam latex prosthetic and decorated it with mummy wrappings, make-up and paint.

I finished building my mummy hat by painting the mechanical pieces. I made a Nefertiti style hat for my Mozart Project and I decided to re-use it by cutting a hole in it and filling it with a mechanical mummy brain.

I painted/dyed the hat and continued working on the mask for two or three days.

The hat and the mask were painted to match Alisa’s costume.

Not only did the mummy need a brain, but she also needed a inner portion to hold her canopic jar organs.

This “stomach” is supposed to look unnaturally skinny and contain various organs the mummy steals.

The piece is phtographed separately and added in post.

I also built a sarcophagus out of cardboard and drywall.

I also made creepy mummy fingers. All the best monsters have long fingers, and because our mummy wears fingerless gloves, I thought they would be a nice addition! I bought some novelty witch fingers that you can get for Halloween parties, and then using liquid latex and toilet paper, I made them look all gross. Then, I painted them mummy color, added some blood and fingernail varnish to the nails, and came up with some delightfully unpleasant props!

In the image below you will see the finished mummy fingers! They are very fun to wear!

Photographing the Mummy
After all the little details were ready, the model who portrayed our Victorian Ghost, Kat, returned to portray the Mummy!

Wearing the costume created by Alisa Kester and my hat, make-up and mechanical effects, the mummy came to life!
I did the creature FX on Kat myself, and used a foam latex appliance as a base. I would like to thank Kat for putting herself through this process, because the latex hurt her when we took it off. We covered so much of her chest, neck and arms! Kat is a fantastic performance artist and great at expressive movements. She is just wonderful at bringing these monsters to life!
You will also notice that she is wearing the Mummy Fingers that I mentioned!

Catey also came to help assist with the photos. It is absolutely essential to have an assistant to help when working with composite photos, so I’d also like to thank Catey for her help on this project! She always finds herself doing weird little tasks like rotating mechanical innards!

I photographed these monster elements separate from the heroes and addedthe mummy to the photo I took of Brin and Jeremy!
Costumes – Philomena Dashwood
Philomena’s costume is a unique creature. It is one I designed in a sketch and that Alisa built in her studio to be used in the book.

The costume is model Brin’s favorite costume that she wore.


The costumes are complimented by a backdrop that I created with my aunt. Using a projector, we enlarged a map of Egypt. I traced the borders, then painted the shading.

After taking the map off the wall, I added all the location names.

Photographing the Heroes
Brin and Jeremy were photographed in front of a greenscreen for the mummy attack.

The two models made broad gestures and had to pretend a mummy was approaching while Philomena was trying to figure out how the amulet worked.

The models were also photographed inside in front of the hand painted Egyptian map.

We shot indoors for the portraits.

In the photo below you can see the the image uses natural and studio lighting.


After all the photos were taken, I took to photoshop to do a mock-up of my favorite images.

Below you can see the final image.

Costumes – Hargrave the Archaeologist
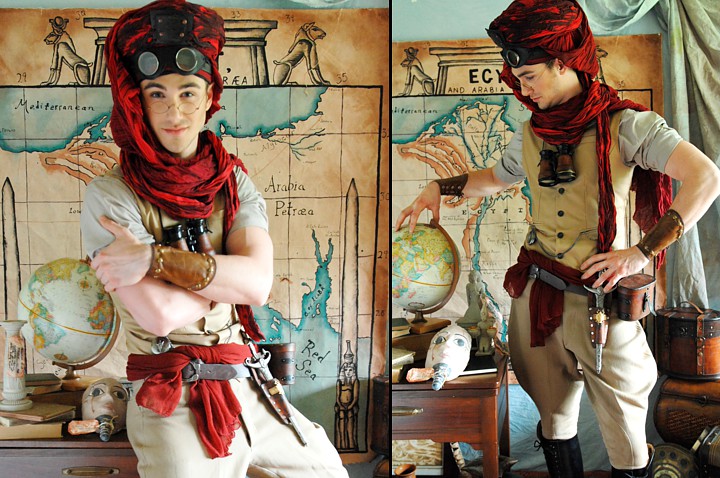
Hargrave, the steampunk Archaeologist, is a handsome rich kid who wants to make a name for himself by discovering a cursed Mummy in Egypt!

Mark Austin models as Hargrave, the steampunk Archaeologist. The costume is almost entirely purchased, which is unusual for this project, but it was designed by myself.

I bought fabric to make numerous articles for this costume, but after realizing I could purchase certain items that I liked better, I went that route instead. I never got around to photographing the pieces, except really briefly, as seen above, where my robot head displayed the turban, to show the model what he’d be wearing. However, I do have images from the pages where I purchased them to share below.
The turban is an authentic costume from the film “The Scorpion King”. I purchased it propstore.com because I thought it looked really cool.

I also dropped a lot of cash on some authentic horse riding boots, since there’s just no way to fake horse riding boots. Nothing really looks like them. I got them in 10.5, since numerous models have told me their foot is between 10 and 11. I have used them in numerous fashion shoots ever since.
I purchased Hargrave’s vest/waistcoat online as well. I loved all the pockets and the pocket watch chain. I was pleased with how it fit Mark, because it seemed a bit big on me and the mannequin, but Mark is really quite burly in the chest.

I also found some really cool leather covered binoculars while out shopping at antique stores, like I do. These ones came with a case which you can see on Mark’s belt in the pictures.

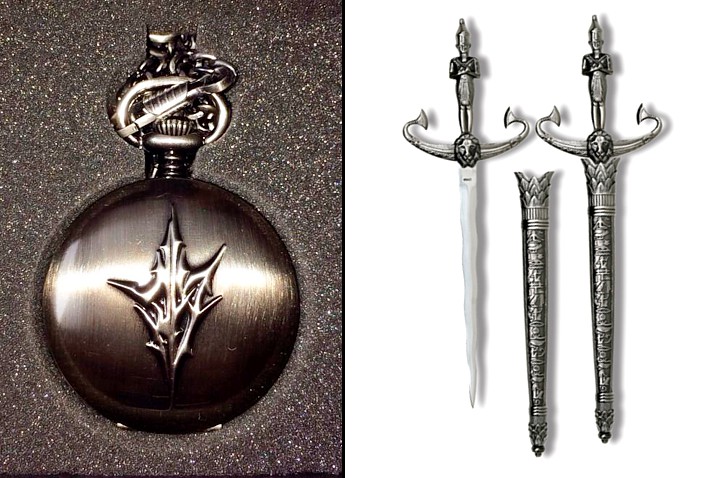
The pocket watch is a gunmetal grey watch which comes straight from my Final Fantasy 13, Part 3: Lighting Returns Collector’s set. I liked the color and how it went with the costume. It also matched the chain that was built into the vest.
The knife was a purchase I made for my Mozart Project, but the store actually sent me the wrong one. The one I wanted had Isis, not this vaguely Osiris lookin’ fella. Anyway, I never sent it back, and so it finally shows up in a picture that I took. I’ve tried to work it into quite a few, but it always ends up just out of frame.
The shirt was purchased at Ross, because for some reason Ross has everything that I want that I don’t have time to make. I’ve had a 100% success rate. So, yeah Ross!

The leather bracers are the only items I made specifically for the archaeologist.
Photographing Hargrave
The photos of the archaeologist were shot in Seattle with Sam Kuster on hair and make-up.

The glasses made Mark look a little bit like Harry Potter!
And, as you know from reading the book, Hargrave gets a shirtless scene as well. So, we’ll end on an outtake of Mark flexing.

